


Bujin's (Or War Gods) are An Archetype being introduced in Judgment of the Light. They are based off of Japanese Gods and Artifacts, and are all Beast-Warrior, Winged-Beast, and Beast type monsters; in addition they are all light monsters. They'll hit the ground running once they see their official release. This particular build has two card from the Shadow Specters support, although they should be easily replaceable before shadow specters.
(My Decklist)
https://i.imgur.com/UltEHgq.png
Monster Discussion.
First let's get the Beast-Warriors out of the way

Once per turn, during your End Phase: You can add 1 "Bujin" monster from your Deck to your hand, then send 1 card from your hand to the Graveyard. You can only control 1 "Bujin Yamato".
Yamato is the deck, Protect him with your life! Luckily the whole deck is geared to helping him stay alive. 1800 atk is pretty high and Bujingi crane is around to make sure he doesn't lose too many fights. Unfortunately card effects don't care about that, however if they target, Bujingi Turtle will put a stop to that jive. Facing down a big boss monster and Crane isn't around to help? Bujingi Quillin will make sure to get Yamato out of a jam, he'll even stop those face up spells and traps as well! As you can see the deck is geared towards playing Protect Yamato at all times. Use his effect during the endphase to put those Bujingi artifacts where they belong, and make them live! His effect add to the hand then throws to the graveyard, which is very important with Vanity's emptiness.
Run 3 Bujin Yamato in any build

When a Beast-Warrior-Type "Bujin" monster you control is destroyed (either by battle or by card effect) and sent to the Graveyard: You can Special Summon this card from your hand. Once per turn, during the End Phase, if a "Bujin" monster was previously sent from your hand to your Graveyard this turn while you controlled this face-up card: You can add 1 "Bujin" Spell/Trap Card from your Deck to your hand. You can only control 1 "Bujin Mikazuchi".
The next Main Beast-Warrior for the deck. While he may have higher attack and look much cooler than Yamato, he's not quite as useful as Yamato but can get your other Bujins live again. He can search for "Bujincarnation" which can help you jump right back into the game when things are looking bleak. He also can get you "Bujin Regalia - The Mirror" which can act as "Cold wave" but not quite as good. His effect even has him replace Yamato for the time being, should something happen to Yamato.
Run 1-2 of Bujin Mikazuchi.
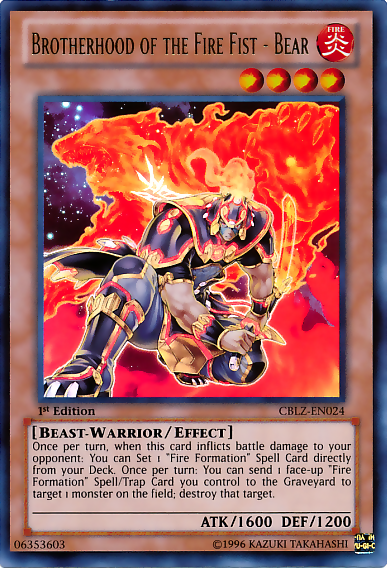
Once per turn, when this card inflicts battle damage to your opponent: You can Set 1 "Fire Formation" Spell Card directly from your Deck. Once per turn: You can send 1 face-up "Fire Formation" Spell/Trap Card you control to the Graveyard to target 1 monster on the field; destroy that target.
Well Bear seems to be seeing a lot of play recently. His main use in this deck is to get your "Fire Formation - Tenki" so you can search for Yamato or Mikazuchi. He can also clear away any annoying monsters, although Yamato and Mikazuchi can do that with a little help from their friends. Assuming he survives he can be used to XYZ summon Bujintei - Kagutsuchi.
Run 1-2 of Brotherhood of the Fire Fist - Bear.
Now on to the other Beast's

During damage calculation (in either player's turn), if a Beast-Warrior-Type "Bujin" monster you control battles an opponent's monster: You can send this card from your hand to the Graveyard; the ATK of your monster becomes double its original ATK, during that damage calculation only.
Look we get our very own Kalut/Honest! Unfortunately unlike Kalut you need to battle a monster, or unlike honest you might not always be guaranteed to win the fight.
He's the reason Yamato or Mikazuchi will come out on top in just about any fight. Unless they're playing "Macro Cosmos" or "Dimensional Fissure" in which case Good luck with that. If you don't open up with him, use Yamato to search him and then throw Quilin or Turtle in the graveyard. He works around Vanity's Emptiness, which is great.
Run 3 of Bujingi Crane

If you control a Beast-Warrior-Type "Bujin" monster: You can banish this card from your Graveyard, then target 1 face-up card your opponent controls; destroy that target. You can only use the effect of "Bujingi Quilin" once per turn.
He can deal with most of what ails you, unfortunately he's only once per turn, and can only be used if Yamato, Mikazuchi, and either "Bujintei" XYZ are on the field but that shouldn't be too big a problem. Field spells, Boss monsters, and maybe even "Macro Cosmos" or "Dimensional Fissure" should fall before him.
Run 3 Of Bujingi Quilin

During either player's turn, when a card or effect is activated that targets a "Bujin" monster you control: You can banish this card from your Graveyard; negate that effect.
Remember how I said Yamato doesn't care too much about Targeting? Well this is why, If this guy is in your grave, Yamato or Mikazuchi will laugh at Dracossack, Dimensional Prison, Forbidden Chalice, Effect Veiler, and even Breakthrough skill! Be aware, selecting also means to target, so even some other cards will fail against him.
Run 2-3 Of Bujingi Turtle

During your opponent's Main Phase: You can send this card from your hand to the Graveyard to target 1 face-up Effect monster your opponent controls; negate that target's effects until the End Phase.
Well, She should be self explanatory, negating a monster effect is pretty good and might just save your ass. Considering most people don't expect effect veiler, it could leave a lasting impression, and you could potentially play mind games with your opponent. She also works around Vanity's Emptiness which is very important.
run 1-2 of Effect Veiler

During your Main Phase: You can return this card from the field to its owner's hand. During either player's Damage Step, when a face-up LIGHT monster you control battles: You can send this card from your hand to the Graveyard; that monster gains ATK equal to the ATK of the opponent's monster it is battling, until the End Phase.
Honest is a beast of hand trap. It doesn't need any explanation. If you could run any more than one I would
run 1 because you can only run one.
Now onto the Spells!

If your opponent controls a monster and you control no monsters: Target 1 "Bujin" monster in your Graveyard and 1 of your banished "Bujin" monsters; Special Summon both targets. They cannot be used as Xyz Materials for an Xyz Summon, except for the Xyz Summon of a Beast, Beast-Warrior, or Winged Beast-Type monster.
This card can really help you jump back into the game if your falling behind, and as mentioned before it is searchable by Mikazuchi. Unfortunately there are two conditions that need to be filled before it can be used, and it's completely dead early game. But mid to late game it could potentially win you the game.
Run 1-2 of Bujincarnation
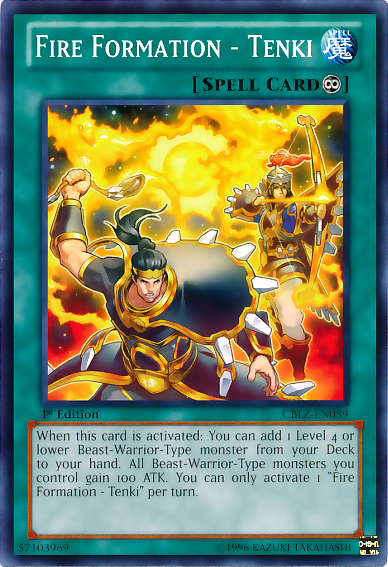
When this card is activated: You can add 1 Level 4 or lower Beast-Warrior-Type monster from your Deck to your hand. All Beast-Warrior-Type monsters you control gain 100 ATK. You can only activate 1 "Fire Formation - Tenki" per turn.
Read that Effect, now tell me that Isn't self explanatory.
Run 3 Fire formation - Tenki's No Questions.

Target 1 face-up monster on the field; until the End Phase, it loses 800 ATK, but is unaffected by the effects of other Spell/Trap Cards.
More Protection for Yamato? Yes please! On top of protecting Yamato it can help you win fights, and survive that dark hole or bottomless trap hole.
Run 1-2 Of forbidden Lance.

Reveal the top 3 cards of your Deck, add 1 of them to your hand, then shuffle the rest back into your Deck. You can only activate 1 "Pot of Duality" per turn. You cannot Special Summon during the turn you activate this card.
You won't be special summoning too much in this deck, so Pot of Duality is great for this deck. Deck thinning is just too much to pass up on, especially if you don't open up with Yamato.
Run 2 of Pot of Duality.
Mystical space typhoon
Dark Hole
Heavy storm
Monster Reborn.
these are also great spells to run, but it's up to you.
Now for the traps.

When your opponent Summons a monster(s) with 1500 or more ATK: Destroy that monster(s) with 1500 or more ATK, and if you do, banish it instead of sending it to the Graveyard.
Bottomless doesn't see too much play anymore, but in this deck it can help you to apply the pressure when your opponent goes for a push. It'll stop most XYZ's from becoming a threat, and it might just make your opponent lose their normal summon.
run 0-2, it really depends on your preference.

Target 1 monster on the field; return that target to the hand.
Pretty self explanatory for why you would use it. It get's rid of dracossack pretty painlessly, Big eye cringes at it's sight, but master of blades doesn't care though.
run 2-3 of Compulsory evacuation device.

When an opponents monster declares and attack: Destroy all attack position monster your opponent controls.
More Protection for Yamato! Destroying all of your opponents monsters and protecting Yamato is way too good to pass up, Run this over dimensional prison as Dimensional Prison targets and that sucks in the mirror match.
Run 1-2 of Mirror force.


The solemn Duo get special treatment since they are so similar.
Judgment negate Just about anything aside from effect's and effect summons. Although it's at the cost of half of your life points, upside is you can always pay that cost
Warning negates any summon, from Normal and flip, to Inherent and Effect. At the cost of 2000, it might not always be live, especially nearing late game.
run both at one, because you can only run one

Neither player can Special Summon monsters. Destroy this card when a card is sent from the Deck or the field to your Graveyard.
Ah yes, this is one of the reasons the deck can keep up with dragon rulers. While the final part of it might seem pretty hard to avoid, remember it says from the field or deck. It does not mention from the hand, which is pretty freaking awesome. Effect veiler and Crane get around it so you can put up a good fight without getting your own special summons.
run 2-3 or side deck 1 Vanity's emptiness instead of running 3.
Now the extra deck.

2 Level 4 "Bujin" monsters
This card can attack all monsters your opponent controls once each. Once per turn: You can detach 1 Xyz Material from this card; take 1 "Bujin" monster from your Deck, and either add it to your hand or send it to the Graveyard. You can only control 1 "Bujintei Susanowo".
The Big boss of the deck. While the focus may be to protect Yamato, this guy's your boss monster. He combo's well with Horn of the Phantom Beast if you so choose to use it. I would recommend using him mid to late game, particularly as a game finisher. Although early game usage is an option as searching or sending for any Bujin Monster is damn good. He's a prime target for Honest, but only if your opponent has multiple monster on the field.
run 1-2 of Bujintei Susanowo

2 Level 4 Beast-Warrior-Type monsters
When this card is Xyz Summoned: Send the top 5 cards of your Deck to the Graveyard; this card gains 100 ATK for each "Bujin" card sent to the Graveyard to activate this effect. If a Beast-Warrior-Type "Bujin" monster(s) you control would be destroyed by battle or by a card effect, you can detach 1 Xyz Material from this card instead of destroying 1 of those monsters. You can only control 1 "Bujintei Kagutsuchi".
The next Big guy to come out, he can fill your grave with the Bujingi's that you need if your lucky, and gains attack for each sent. He also protect any Bujin monsters from desctruction. He is also more more lenient with his requirements, and by that I mean he's not Archetype specific. Use Him Early to mid game to deck thin hard and get those Bujingi's in the grave early on.
run 1-2 of Bujintei Kagutsuchi.

2 Level 4 LIGHT monsters
Once per turn, during either player's turn: You can detach 1 Xyz Material from this card; all "Constellar" monsters you currently control are unaffected by Spell/Trap effects this turn.
Another beast warrior light type is pretty cool for this deck, A major plus is that he can protect himself, as such he laughs at things such as Spellbook of Fate, dark hole and even Breakthrough skill (If you chain). Also he can upgrade himself to a much stronger form, which we will talk about right after this.
Run 1-2 Of Constellar Omega
2 Level 6 monsters
You can also Xyz Summon this card by using a "Constellar" Xyz Monster you control as the Xyz Material, other than "Constellar Ptolemy M7". (Xyz Materials attached to that monster also become Xyz Materials on this card.) If you do, its effect cannot be activated this turn. Once per turn: You can detach 1 Xyz Material from this card to target 1 monster on the field or in either player's Graveyard; return that target to the hand.
This guy packs quite a punch, especially if he lives for more than a turn. He can get you your Yamato, Mikazuchi, or Crane back, or even just bounce those pesky boss monster that you are facing down. At 2700 though, he might not need to bounce back a monster to deal with it.

2 Level 4 monsters
Once per turn: You can detach 1 Xyz Material from this card to target 1 Beast, Beast-Warrior, or Winged Beast-Type monster you control and 1 other card on the field; destroy them.
Just in case you don't have a Quilin and really need to get rid of something that's causing you some trouble, you can also protect it and start using the Bujingi's as fodder for it.
run 1 of Diamond dire wolf

2 Level 4 monsters
This card cannot attack. Once per turn: You can detach 1 Xyz Material from this card; roll a six-sided die and apply the result.
1: Halve your Life Points. 2: Draw 1 card.
3: Your opponent discards 1 card.
4: Negate the effects of 1 face-up card on the field, until the end of this turn.
5: Destroy 1 card on the field. 6: Destroy this card.
Now it can't attack and it's effect is dependent on a dice roll but hear me out. Only two of it's effects are minuses the others could be major pluses. If you have to negate an effect negate it's own effect and punch for 3000! Also it's main purpose here is so you can EEV it and Game Prophecy's or make Evil swarms easier to deal so they can't protect Ophion with Traps.
Run 0-1 of Number 85: Crazy Box
The rest of the extra deck is personal preference!
I might add a side deck explanation at a different point although your side deck really depends on what's popular in your locals, regionals, or what's being net decked the most on Dueling network or devpro! (Please note I'm only kidding.)
(My Decklist)
https://i.imgur.com/UltEHgq.png
Monster Discussion.
First let's get the Beast-Warriors out of the way
Once per turn, during your End Phase: You can add 1 "Bujin" monster from your Deck to your hand, then send 1 card from your hand to the Graveyard. You can only control 1 "Bujin Yamato".
Yamato is the deck, Protect him with your life! Luckily the whole deck is geared to helping him stay alive. 1800 atk is pretty high and Bujingi crane is around to make sure he doesn't lose too many fights. Unfortunately card effects don't care about that, however if they target, Bujingi Turtle will put a stop to that jive. Facing down a big boss monster and Crane isn't around to help? Bujingi Quillin will make sure to get Yamato out of a jam, he'll even stop those face up spells and traps as well! As you can see the deck is geared towards playing Protect Yamato at all times. Use his effect during the endphase to put those Bujingi artifacts where they belong, and make them live! His effect add to the hand then throws to the graveyard, which is very important with Vanity's emptiness.
Run 3 Bujin Yamato in any build
When a Beast-Warrior-Type "Bujin" monster you control is destroyed (either by battle or by card effect) and sent to the Graveyard: You can Special Summon this card from your hand. Once per turn, during the End Phase, if a "Bujin" monster was previously sent from your hand to your Graveyard this turn while you controlled this face-up card: You can add 1 "Bujin" Spell/Trap Card from your Deck to your hand. You can only control 1 "Bujin Mikazuchi".
The next Main Beast-Warrior for the deck. While he may have higher attack and look much cooler than Yamato, he's not quite as useful as Yamato but can get your other Bujins live again. He can search for "Bujincarnation" which can help you jump right back into the game when things are looking bleak. He also can get you "Bujin Regalia - The Mirror" which can act as "Cold wave" but not quite as good. His effect even has him replace Yamato for the time being, should something happen to Yamato.
Run 1-2 of Bujin Mikazuchi.
Once per turn, when this card inflicts battle damage to your opponent: You can Set 1 "Fire Formation" Spell Card directly from your Deck. Once per turn: You can send 1 face-up "Fire Formation" Spell/Trap Card you control to the Graveyard to target 1 monster on the field; destroy that target.
Well Bear seems to be seeing a lot of play recently. His main use in this deck is to get your "Fire Formation - Tenki" so you can search for Yamato or Mikazuchi. He can also clear away any annoying monsters, although Yamato and Mikazuchi can do that with a little help from their friends. Assuming he survives he can be used to XYZ summon Bujintei - Kagutsuchi.
Run 1-2 of Brotherhood of the Fire Fist - Bear.
Now on to the other Beast's
During damage calculation (in either player's turn), if a Beast-Warrior-Type "Bujin" monster you control battles an opponent's monster: You can send this card from your hand to the Graveyard; the ATK of your monster becomes double its original ATK, during that damage calculation only.
Look we get our very own Kalut/Honest! Unfortunately unlike Kalut you need to battle a monster, or unlike honest you might not always be guaranteed to win the fight.
He's the reason Yamato or Mikazuchi will come out on top in just about any fight. Unless they're playing "Macro Cosmos" or "Dimensional Fissure" in which case Good luck with that. If you don't open up with him, use Yamato to search him and then throw Quilin or Turtle in the graveyard. He works around Vanity's Emptiness, which is great.
Run 3 of Bujingi Crane
If you control a Beast-Warrior-Type "Bujin" monster: You can banish this card from your Graveyard, then target 1 face-up card your opponent controls; destroy that target. You can only use the effect of "Bujingi Quilin" once per turn.
He can deal with most of what ails you, unfortunately he's only once per turn, and can only be used if Yamato, Mikazuchi, and either "Bujintei" XYZ are on the field but that shouldn't be too big a problem. Field spells, Boss monsters, and maybe even "Macro Cosmos" or "Dimensional Fissure" should fall before him.
Run 3 Of Bujingi Quilin
During either player's turn, when a card or effect is activated that targets a "Bujin" monster you control: You can banish this card from your Graveyard; negate that effect.
Remember how I said Yamato doesn't care too much about Targeting? Well this is why, If this guy is in your grave, Yamato or Mikazuchi will laugh at Dracossack, Dimensional Prison, Forbidden Chalice, Effect Veiler, and even Breakthrough skill! Be aware, selecting also means to target, so even some other cards will fail against him.
Run 2-3 Of Bujingi Turtle
During your opponent's Main Phase: You can send this card from your hand to the Graveyard to target 1 face-up Effect monster your opponent controls; negate that target's effects until the End Phase.
Well, She should be self explanatory, negating a monster effect is pretty good and might just save your ass. Considering most people don't expect effect veiler, it could leave a lasting impression, and you could potentially play mind games with your opponent. She also works around Vanity's Emptiness which is very important.
run 1-2 of Effect Veiler
During your Main Phase: You can return this card from the field to its owner's hand. During either player's Damage Step, when a face-up LIGHT monster you control battles: You can send this card from your hand to the Graveyard; that monster gains ATK equal to the ATK of the opponent's monster it is battling, until the End Phase.
Honest is a beast of hand trap. It doesn't need any explanation. If you could run any more than one I would
run 1 because you can only run one.
Now onto the Spells!
If your opponent controls a monster and you control no monsters: Target 1 "Bujin" monster in your Graveyard and 1 of your banished "Bujin" monsters; Special Summon both targets. They cannot be used as Xyz Materials for an Xyz Summon, except for the Xyz Summon of a Beast, Beast-Warrior, or Winged Beast-Type monster.
This card can really help you jump back into the game if your falling behind, and as mentioned before it is searchable by Mikazuchi. Unfortunately there are two conditions that need to be filled before it can be used, and it's completely dead early game. But mid to late game it could potentially win you the game.
Run 1-2 of Bujincarnation
When this card is activated: You can add 1 Level 4 or lower Beast-Warrior-Type monster from your Deck to your hand. All Beast-Warrior-Type monsters you control gain 100 ATK. You can only activate 1 "Fire Formation - Tenki" per turn.
Read that Effect, now tell me that Isn't self explanatory.
Run 3 Fire formation - Tenki's No Questions.
Target 1 face-up monster on the field; until the End Phase, it loses 800 ATK, but is unaffected by the effects of other Spell/Trap Cards.
More Protection for Yamato? Yes please! On top of protecting Yamato it can help you win fights, and survive that dark hole or bottomless trap hole.
Run 1-2 Of forbidden Lance.
Reveal the top 3 cards of your Deck, add 1 of them to your hand, then shuffle the rest back into your Deck. You can only activate 1 "Pot of Duality" per turn. You cannot Special Summon during the turn you activate this card.
You won't be special summoning too much in this deck, so Pot of Duality is great for this deck. Deck thinning is just too much to pass up on, especially if you don't open up with Yamato.
Run 2 of Pot of Duality.
Mystical space typhoon
Dark Hole
Heavy storm
Monster Reborn.
these are also great spells to run, but it's up to you.
Now for the traps.
When your opponent Summons a monster(s) with 1500 or more ATK: Destroy that monster(s) with 1500 or more ATK, and if you do, banish it instead of sending it to the Graveyard.
Bottomless doesn't see too much play anymore, but in this deck it can help you to apply the pressure when your opponent goes for a push. It'll stop most XYZ's from becoming a threat, and it might just make your opponent lose their normal summon.
run 0-2, it really depends on your preference.
Target 1 monster on the field; return that target to the hand.
Pretty self explanatory for why you would use it. It get's rid of dracossack pretty painlessly, Big eye cringes at it's sight, but master of blades doesn't care though.
run 2-3 of Compulsory evacuation device.
When an opponents monster declares and attack: Destroy all attack position monster your opponent controls.
More Protection for Yamato! Destroying all of your opponents monsters and protecting Yamato is way too good to pass up, Run this over dimensional prison as Dimensional Prison targets and that sucks in the mirror match.
Run 1-2 of Mirror force.
The solemn Duo get special treatment since they are so similar.
Judgment negate Just about anything aside from effect's and effect summons. Although it's at the cost of half of your life points, upside is you can always pay that cost
Warning negates any summon, from Normal and flip, to Inherent and Effect. At the cost of 2000, it might not always be live, especially nearing late game.
run both at one, because you can only run one
Neither player can Special Summon monsters. Destroy this card when a card is sent from the Deck or the field to your Graveyard.
Ah yes, this is one of the reasons the deck can keep up with dragon rulers. While the final part of it might seem pretty hard to avoid, remember it says from the field or deck. It does not mention from the hand, which is pretty freaking awesome. Effect veiler and Crane get around it so you can put up a good fight without getting your own special summons.
run 2-3 or side deck 1 Vanity's emptiness instead of running 3.
Now the extra deck.
2 Level 4 "Bujin" monsters
This card can attack all monsters your opponent controls once each. Once per turn: You can detach 1 Xyz Material from this card; take 1 "Bujin" monster from your Deck, and either add it to your hand or send it to the Graveyard. You can only control 1 "Bujintei Susanowo".
The Big boss of the deck. While the focus may be to protect Yamato, this guy's your boss monster. He combo's well with Horn of the Phantom Beast if you so choose to use it. I would recommend using him mid to late game, particularly as a game finisher. Although early game usage is an option as searching or sending for any Bujin Monster is damn good. He's a prime target for Honest, but only if your opponent has multiple monster on the field.
run 1-2 of Bujintei Susanowo
2 Level 4 Beast-Warrior-Type monsters
When this card is Xyz Summoned: Send the top 5 cards of your Deck to the Graveyard; this card gains 100 ATK for each "Bujin" card sent to the Graveyard to activate this effect. If a Beast-Warrior-Type "Bujin" monster(s) you control would be destroyed by battle or by a card effect, you can detach 1 Xyz Material from this card instead of destroying 1 of those monsters. You can only control 1 "Bujintei Kagutsuchi".
The next Big guy to come out, he can fill your grave with the Bujingi's that you need if your lucky, and gains attack for each sent. He also protect any Bujin monsters from desctruction. He is also more more lenient with his requirements, and by that I mean he's not Archetype specific. Use Him Early to mid game to deck thin hard and get those Bujingi's in the grave early on.
run 1-2 of Bujintei Kagutsuchi.
2 Level 4 LIGHT monsters
Once per turn, during either player's turn: You can detach 1 Xyz Material from this card; all "Constellar" monsters you currently control are unaffected by Spell/Trap effects this turn.
Another beast warrior light type is pretty cool for this deck, A major plus is that he can protect himself, as such he laughs at things such as Spellbook of Fate, dark hole and even Breakthrough skill (If you chain). Also he can upgrade himself to a much stronger form, which we will talk about right after this.
Run 1-2 Of Constellar Omega
2 Level 6 monsters
You can also Xyz Summon this card by using a "Constellar" Xyz Monster you control as the Xyz Material, other than "Constellar Ptolemy M7". (Xyz Materials attached to that monster also become Xyz Materials on this card.) If you do, its effect cannot be activated this turn. Once per turn: You can detach 1 Xyz Material from this card to target 1 monster on the field or in either player's Graveyard; return that target to the hand.
This guy packs quite a punch, especially if he lives for more than a turn. He can get you your Yamato, Mikazuchi, or Crane back, or even just bounce those pesky boss monster that you are facing down. At 2700 though, he might not need to bounce back a monster to deal with it.
2 Level 4 monsters
Once per turn: You can detach 1 Xyz Material from this card to target 1 Beast, Beast-Warrior, or Winged Beast-Type monster you control and 1 other card on the field; destroy them.
Just in case you don't have a Quilin and really need to get rid of something that's causing you some trouble, you can also protect it and start using the Bujingi's as fodder for it.
run 1 of Diamond dire wolf
2 Level 4 monsters
This card cannot attack. Once per turn: You can detach 1 Xyz Material from this card; roll a six-sided die and apply the result.
1: Halve your Life Points. 2: Draw 1 card.
3: Your opponent discards 1 card.
4: Negate the effects of 1 face-up card on the field, until the end of this turn.
5: Destroy 1 card on the field. 6: Destroy this card.
Now it can't attack and it's effect is dependent on a dice roll but hear me out. Only two of it's effects are minuses the others could be major pluses. If you have to negate an effect negate it's own effect and punch for 3000! Also it's main purpose here is so you can EEV it and Game Prophecy's or make Evil swarms easier to deal so they can't protect Ophion with Traps.
Run 0-1 of Number 85: Crazy Box
The rest of the extra deck is personal preference!
I might add a side deck explanation at a different point although your side deck really depends on what's popular in your locals, regionals, or what's being net decked the most on Dueling network or devpro! (Please note I'm only kidding.)
Last edited by Cherry_Boy on Wed Aug 07, 2013 11:11 am; edited 3 times in total


